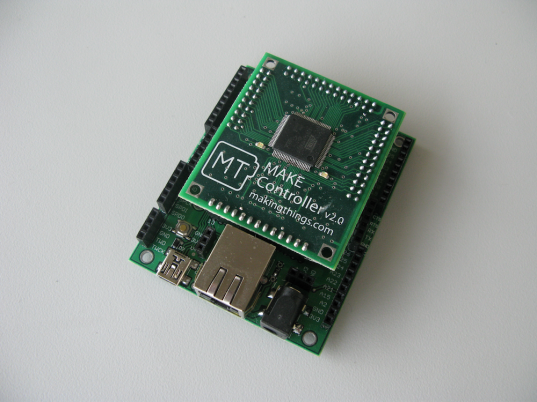
MakingThings sell a line of hardware tools (Make Controller) that provide an easy way to create unique interactive devices, machines, and environments by controlling a wide range of sensors and actuators – akin to the Arduino. In this overview, we will look at the Make Controller 2.0 & Interface Board Kit.
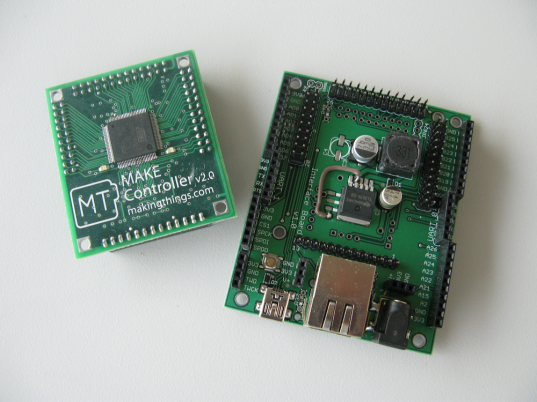
The Make Controller 2.0 makes use of the Atmel SAM7X processor, which is based on the ARM7 32-bit architecture. It features 256K Flash memory, 64K SRAM, and can operate up to 55MHz. MakingThings employ a two-board layout schema, with the Make Controller Board and Interface Board or Application Board. In general, the Make Controller Board plugs into the Interface or Application Board.

The Make Controller Board provides almost all of the signals from the Atmel SAM7X, and includes 256K EEPROM (additional storage), an Ethernet PHY (Ethernet connection), and the CAN Transceiver (Make Controller to Make Controller communication). Whereas, the Interface Board or the Application Board have application specific hardware for networking (Ethernet/USB/CAN/Serial/SPI), motor control, and circuit protection.
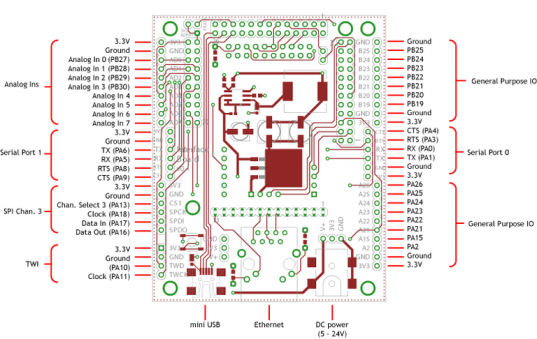
On the Interface Board, all I/O pins are 0.1″ spaced, making it easy to connect, prototype and communicate with your devices. The Interface Board provides the following I/O options:
- 2.0 Full Serial Ports – 1 Debug Serial Port without Handshaking.
- 2.0 SPI Channels
- 2.0 TWI Channels
- CAN
- 15 Configurable I/O
- 4 Dedicated Analog Inputs – 4 Configurable Analog Inputs
- USB & Ethernet
- JTAG Port
The I/O signal routing on the Interface Board is quite flexible, most signals (except the dedicated Analog Ins) can be configured to operate as general I/O pins. The associated I/O pins for non active peripherals can then be configured as general I/O – allowing up to 35 possible I/O pins.

MakingThings provides a complete tool chain in order to program the Make Controller. The software environment – firmware, mchelper, mcbuilder provide a consistent cross platform experience. The firmware and the associated libraries are organised into sections according to function, and thoroughly documented. MakingThings recently developed mcbuilder, which is a simple development environment that contains everything needed to write and debug programs for the Make Controller. Whereas mchelper, is a program that allows one to configure your Make Controller – at run time.
The Make Controller can interface directly with programs written in .Net, Processing & Java, Max & Pd, Flash, OpenFrameworks/C/C++ – the OSC Protocol is fully supported in the Make Controller firmware. The Make Controller is programmed through a simplified C API, which uses FreeRTOS as the operating system. The inclusion of FreeRTOS in the firmware ensures that the more troublesome aspects of microcontroller programming (interrupts, memory management etc.) are taken care – thereby allowing more time to explore the potential of ones project.
The example below demonstrates the general structure of a Make Controller program. In particular, the Make Controller is instructed to Blink the status LED – infinitely many times.
#include "stdlib.h" #include "config.h" #include "string.h" // Function Signature void BlinkTask( void* parameters ); void Run( ) { // Create the Blink Task TaskCreate( BlinkTask, "Blink", 400, 0, 1 ); // Do this right quick after booting up - otherwise we won't be recognised Usb_SetActive( 1 ); // Fire up the OSC system Osc_SetActive( true, true, true, true ); // Add all the OSC subsystems Osc_RegisterSubsystem( DebugOsc_GetName(), DebugOsc_ReceiveMessage, NULL ); // Starts the network up. Will not return until a network is found... Network_SetActive( true ); } void BlinkTask( void* p ) { (void)p; // Turn on the Status LED Led_SetState( 1 ); Sleep( 1000 ); while ( true ) { Led_SetState( 0 ); Sleep( 90 ); Led_SetState( 1 ); Sleep( 10 ); } }Unless otherwise stated, this code is released under the MIT License – Please use, change and share it.
More examples of working with the Make Controller 2.0 & Interface Board – soon.
