DC Motors (DC standing for Direct Current) create electromagnetic force from current which spins an output shaft. In spins according to the polarity of the voltage, so switching the polarity switches the directionality of the shaft’s rotation.
What should I use it for?
DC Motors are very useful when you need something light to go quickly. You can get variations easily through PWM (more on this later) and excel in binary motor on/ motor Off scenarios. If you want to change directions you’ll need and H-bridge setup (explained later) which can be pretty compact but still might be a hindrance in certiain designs. Because most DC motors need 12V to get their full range of movement, the arduino alone is not enough to power it. Ultimately, a DC Motor is strong when you need to control a motor’s speed more than it’s positioning.
Ex: Fans, spinning the wheels on a small car, or twirling fabric
Enhancements:
H-Bridge Direction and Speed control
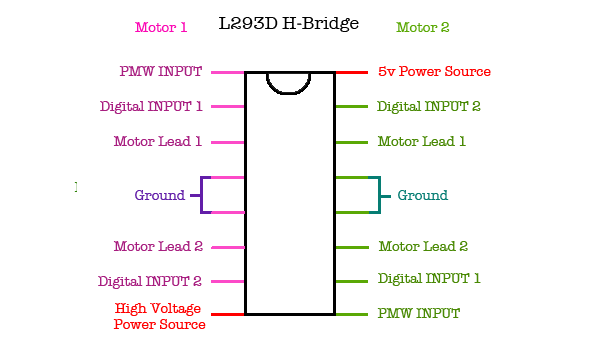
H-Bridge are very convenient little chips. I am talking specifically on how to use and wire the L293D 16-pin H-Bridge. It can handle two seperate motors and is wired as so:
For the Arduino it’s easy to write the code yourself. Simply send your analogWrite(pmw) signal to the pmw pin to control the speed, and send either digitalWrite(HIGH) or digitalWrite(LOW) to the corresponding motor Input pins. Watch out! If you want the motor be still, set both pins to HIGH instead of to LOW because you risk damaging the motor. You can also make the motor still by setting the PWM to 0.
The mbed does much of this for you through the Motor.h library.
First, import the library in 4 easy steps.
1: Click on Import (beside the New icon) and click on the Libraries tab.
2: Search for : Motor.h
3: Select the one written by Simon Ford
4: Click the Import! button in the top-right corner.
Ta-daa! You can now have access to this library. After declaring your motor and setting your pins appropriately, setting the speed and direction is a simple as passing a float between -1 and 1 into the speed() method. The library takes the value you send and does two things- first it checks if it’s negative or positive and maps the directionality that way. Second, it takes the absolute value of the float (the float as a positive number) and sends it to the PMW pin directly.
Here’s an example of an H-bridge in action, spinning the motor faster and slower in both directions to move the cloth. It follows this example code:
Mosfet speed control
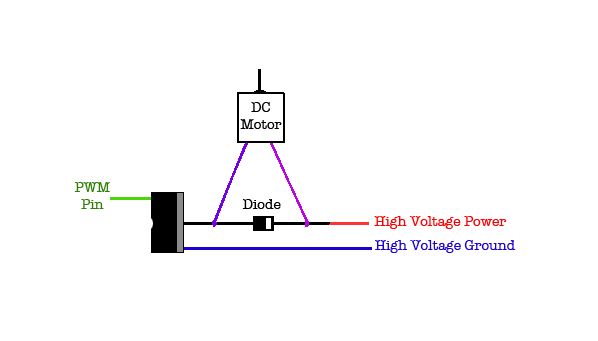
If all you need to do is control the speed of the motor and not the direction, you can use a Mosfet to safely control the high-voltage power. Mosfets are wired like this:
Make sure that the ground of your microcontroller (Arduino/mbed) is also connected to the High voltage ground and the Mosfet ground. The Diode between the DC Motor are connections is important because sometimes the motor switching polarities can cause a power surge. The diode ensure that the extra power gets sent back to the source and not towards your arduino.
 For the Arduino it’s easy to write the code yourself. Simply send your analogWrite(pmw) signal to the pmw pin to control the speed, and send either digitalWrite(HIGH) or digitalWrite(LOW) to the corresponding motor Input pins. Watch out! If you want the motor be still, set both pins to HIGH instead of to LOW because you risk damaging the motor. You can also make the motor still by setting the PWM to 0.
The mbed does much of this for you through the Motor.h library.
First, import the library in 4 easy steps.
1: Click on Import (beside the New icon) and click on the Libraries tab.
2: Search for : Motor.h
3: Select the one written by Simon Ford
4: Click the Import! button in the top-right corner.
Ta-daa! You can now have access to this library. After declaring your motor and setting your pins appropriately, setting the speed and direction is a simple as passing a float between -1 and 1 into the speed() method. The library takes the value you send and does two things- first it checks if it’s negative or positive and maps the directionality that way. Second, it takes the absolute value of the float (the float as a positive number) and sends it to the PMW pin directly.
Here’s an example of an H-bridge in action, spinning the motor faster and slower in both directions to move the cloth. It follows this example code:
For the Arduino it’s easy to write the code yourself. Simply send your analogWrite(pmw) signal to the pmw pin to control the speed, and send either digitalWrite(HIGH) or digitalWrite(LOW) to the corresponding motor Input pins. Watch out! If you want the motor be still, set both pins to HIGH instead of to LOW because you risk damaging the motor. You can also make the motor still by setting the PWM to 0.
The mbed does much of this for you through the Motor.h library.
First, import the library in 4 easy steps.
1: Click on Import (beside the New icon) and click on the Libraries tab.
2: Search for : Motor.h
3: Select the one written by Simon Ford
4: Click the Import! button in the top-right corner.
Ta-daa! You can now have access to this library. After declaring your motor and setting your pins appropriately, setting the speed and direction is a simple as passing a float between -1 and 1 into the speed() method. The library takes the value you send and does two things- first it checks if it’s negative or positive and maps the directionality that way. Second, it takes the absolute value of the float (the float as a positive number) and sends it to the PMW pin directly.
Here’s an example of an H-bridge in action, spinning the motor faster and slower in both directions to move the cloth. It follows this example code:
 Make sure that the ground of your microcontroller (Arduino/mbed) is also connected to the High voltage ground and the Mosfet ground. The Diode between the DC Motor are connections is important because sometimes the motor switching polarities can cause a power surge. The diode ensure that the extra power gets sent back to the source and not towards your arduino.