What is it?
A stepper motor rotates in small precise increments named steps or phases. They theoretically move at a constant pace and as the speed increases the torque decreases. They are the most powerful when holding their position. Unlike servo motors that can determine their position by an angular value, stepper motor’s position can only be determined by tracking the steps from an initial point. They are very precise and reliable motors, capable of continuous rotation There are two kinds of stepper motors, bipolar and unipolar. The bipolar motor usually has 4 wires and can be identified by using measuring the resistance between the wires. They are called bipolar because they have two coils, each with a pair of wires connecting. Each pair should have a matching resistance. Bipolar motors are harder to use and less popular for hobbyists. Unipolar motors have a simpler control scheme, so I will focus on those. They usually have between 5-8 wires, 5 of which go to the integrated controller circuit. Identifying the wires can be tricky, since there are no standard color conventions, but doing so properly is important. Identifying your wires: First, you need to determine the common lead, the wire that connects all the others and will connect to the positive of the power supply. If you have… 5 wires: Measure the resistance between each pair of wires- one of them will consistently read as having half the resistance compared to the values given by other pairs. This wire is the common. 6 wires: Measure the resistance between each pair of wires to isolate the two that read consistently lowest. These two wires will need to be joined to form the common. 8 wires: Measure the resistance between each pair until you have separated them into 4 pairs with infinite resistance between them. Once these sets are made, join one wire from each pair together to form the lead. The 4 other wires’ position will be determined relative to the common lead. It is very important to keep their position the same throughout. To make this simpler, I recommend soldering the wires to headers as soon as you are sure of their correct order. The unipolar motor has four coils, so what we are doing now is determining which wire leads to which coil. Follow these steps to identify the wire 1- Connect the common lead to the positive end of your power supply. 2- Connect any of the other leads to ground and identify it as coil 3- One at a time, connect the other wires to ground as well and watch the motor shaft. If it stays still then it is coil 2. If it twitches clockwise it is coil 3. If it twitches counter-clowise it is coil 1. Once this order is determined, the easiest way to control a stepper motor is through a darlington array.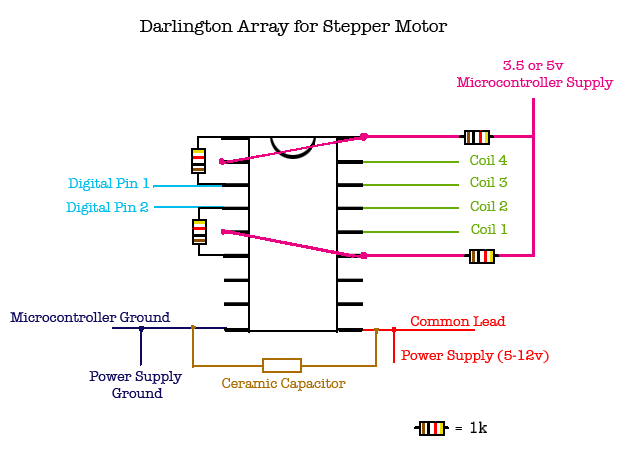 This is an example using a darlington array and a unipolar stepper motor and a number pad You can see how to wire the number pad on the right.
You can send the stepper motor instructions on the number of steps to take with the number Pad. First, you press either A or B, A is for a positive number and B is for a negative number and influences the directionality of the steps. the code accepts a number between 0 and 999. You can press C to Clear the current number and D to send the number off to the motor. Use the serial monitor to see what you punched in. If you continue to press D, you continue to increment by the last submitted value.
Here’s the code:
This is an example using a darlington array and a unipolar stepper motor and a number pad You can see how to wire the number pad on the right.
You can send the stepper motor instructions on the number of steps to take with the number Pad. First, you press either A or B, A is for a positive number and B is for a negative number and influences the directionality of the steps. the code accepts a number between 0 and 999. You can press C to Clear the current number and D to send the number off to the motor. Use the serial monitor to see what you punched in. If you continue to press D, you continue to increment by the last submitted value.
Here’s the code:
//For this example we're going to need both the stepper and keypad libraries
#include
#include
//The key pad in this example is 4x4
const byte rows = 4;
const byte cols = 4;

//1 or -1, starts as 0 to set the motor backwards or forwards
int polarity;

boolean isCounting = false;

//ensures that we have 3 digit number
int numSteps[] = {
0,0,0};
//keeps track of where to place the number
int currentIndex;
//keeps track of the current number of steps
int keyNum;
//set the keys according to the number pad
char keys[rows][cols] = {
{
'1','2','3', 'A' }
,
{
'4','5','6', 'B' }
,
{
'7','8','9', 'C' }
,
{
'#','0','*', 'D' }
};
//connect to the row pinouts of the keypad
byte rowPins[rows] = {
7,6,5,4};
//connect to the column pinouts of the keypad
byte colPins[cols] = {
12,10,9,8};
Keypad keypad = Keypad( makeKeymap(keys), rowPins, colPins, rows, cols );
// Number of steps for a rotation (on average 100), control pin 1, control pin 2
Stepper myStepper(100, 11, 3);

void setup(){
//begin the Serial communication so we can see the feedback
Serial.begin(9600);
//speed at which the motor will step, doesn't actually make it move
myStepper.setSpeed(60);
//current index starts at 0
currentIndex =0;
//default keynumber is 0
keyNum =0;

//beginning println is more complex with instructions
Serial.println("////INSTRUCTIONS");
Serial.println("PRESS A or B to start punching in numbers");
Serial.println("PRESS A for positive numbers (Clockwise)");
Serial.println("PRESS B for negative numbers (Counter-Clockwise)");
Serial.println("PRESS C to CLEAR the number and start over");
Serial.println("PRESS D to SEND the steps to the motor and make it move.");
Serial.println("You can keep pressing D to keep sending the same number");
Serial.println("current number of steps");
Serial.println(keyNum);
}

void loop(){

//get the current key being pressed
char key = keypad.getKey();

//if a key is getting pressed
if (key != NO_KEY){
//switch depending on which key is being pressed
switch (key)
{
//A is for Positive numbers
case 'A':
polarity = 1;
isCounting = true;
resetArray();
break;
//B is for negative numbers
case 'B':
polarity = -1;
isCounting = true;
resetArray();
break;
//clear the number and start over
case 'C':
resetArray();
isCounting = false;
break;
//commit the steps to the motor
case 'D':
commitSteps();
resetArray();
isCounting = false;
break;

//send the value of the key to be added to keynum
case '0':
sortKey (0);
break;
case '1':
sortKey (1);
break;
case '2':
sortKey (2);
break;
case '3':
sortKey (3);
break;
case '4':
sortKey (4);
break;
case '5':
sortKey (5);
break;
case '6':
sortKey (6);
break;
case '7':
sortKey (7);
break;
case '8':
sortKey (8);
break;
case '9':
sortKey (9);
break;

}
//println the updated number
Serial.println("current number of steps");
Serial.println(keyNum);
}
}

//sort where to put the key input
void sortKey (int curKey)
{
//if we are listening for new inputs
if (isCounting)
{
//set the current inputed number to the current spot in the array
numSteps[currentIndex]=curKey;
//shift the index
currentIndex ++;
//reset it to 0 if at the end
if (currentIndex >2)
{
currentIndex = 0;
}
//set key num to be index[0]index[1]index[3], using 10 to establish the position. Multiply it by polarity to establish positive or ne
ative
keyNum = polarity*(numSteps[0]*100+numSteps[1]*10+numSteps[2]);
}
}
//reset the array and keynum
void resetArray ()
{
numSteps[0]=0;
numSteps[1]=0;
numSteps[2]=0;
keyNum = polarity*(numSteps[0]*100+numSteps[1]*10+numSteps[2]);

}
//send the steps to the motor
void commitSteps()
{
//debugging println
//Serial.println("STEPPING");
myStepper.step(keyNum);
}
Unless otherwise stated, this code is released under the MIT License – Please use, change and share it.